Print
Newfoundland Raisin Bread
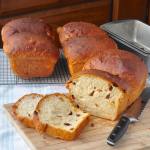
Newfoundland Raisin Bread – a traditional sweet bread made in Newfoundland families for generations. It’s delicious fresh or toasted or turned into French toast with a drizzle of molasses.
Prep Time 30 minutes
Cook Time 40 minutes
Total Time 1 hour 10 minutes
Servings 3 loaves
Calories 151 kcal
Ingredients
To proof the yeast
- 1/2 cup lukewarm water
- 1 tsp sugar
- 1 tsp dry yeast
For rest of the dough
- 5-6 cups all purpose flour
- 2 cups warm milk I use 1 can of evaporated milk and top it up with warm water
- 1/3 cup sugar
- 1 tsp fine salt
- 1/2 cup melted butter
- 1 egg lightly beaten.
- 2 cups raisins I've used sultanas here.
Instructions
-
Proof the yeast by dissolving the 1 tsp of sugar in the 1/2 cup warm water. Sprinkle in the yeast and leave to sit in a warm place for 10 minutes until it gets foamy.
-
It is possible to hand knead this dough entirely but I now make it in my KitchenAid stand mixer.
-
Add 4 cups of the flour to the bowl of your electric mixer with the dough hook attached. Stir in the sugar and salt.
-
Add all of the remaining ingredients except the raisins and turn the mixer on low for about 5 minutes to get the dough started.
-
Begin to add the remaining flour, 1/4 cup at a time leaving it to knead into the dough for a few minutes. Continue to add flour only until the dough releases from the sides and bottom of the bowl, then let the dough knead for another 5 minutes.
-
Turn the dough out onto a lightly floured countertop or breadboard and spread it out flat. Sprinkle the rain ins over the dough and then fold it over several times before kneading by hand for a few minutes to incorporate the raisins evenly throughout the dough.
-
Cover dough and leave to rest and rise for one hour. Punch the dough down and knead it for a few minutes by hand before letting it rest for another 10 minutes.
-
Grease 2 large or 3 small loaf pans. Divide the dough into 6 equal portions. Form each division into a ball. Place 2 balls of dough in each loaf pan. Cover with a clean tea towel and allow the dough to rise until it is about 2 inches above the rim of the pan, about 2 hours depending on room temperature. (NOTE: At this stage, the bread dough can be cold proofed overnight in the fridge if you want to serve it freshly baked early the next day or just want to save time in advance. Just cover the pans with a clean tea towel. You can spray the surface of the dough with water from a spray bottle to prevent the surface of the dough balls from becoming too dry if you like but this is not really necessary with the humidity in most fridges. Just remove the pans from the fridge in the morning and allow them to finish raising to about 2 inches above the pan rim as shown in the photo above, which could be another 1-2 hours and bake as directed below.)
-
Bake at 350 degrees F for 30-40 minutes depending on the size of the pans that you are using. (My largest pans took 50 minutes)The loaves should have a golden crust and sound hollow when tapped to be fully baked.
-
When baked, turn loaves out onto a wire rack to cool. Brush the tops with melted butter if desired to soften the top crust.