Print
Summer Fun M&M Cookies
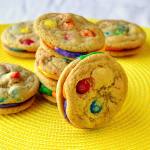
These crispy, chewy M&M cookies are kid approved, fun to make & the bright summertime colors make them perfect for summer picnics, BBQ's and parties.
Prep Time 30 minutes
Cook Time 10 minutes
Total Time 1 hour
Ingredients
For the filling
- 1 1/3 cups flour
- 1/2 teaspoon salt
- 1/2 teaspoon baking soda
- 1/2 cup butter
- 1/2 cup light brown sugar
- 1/2 cup sugar
- 1 egg
- 1 teaspoon vanilla extract or butterscotch flavoring or both! Hint, hint.
- 1/2 pound pkg regular m&m candies
For the filling
- 1 cup white chocolate chips
- 2 tbsp butter
- 1 1/2 cup icing sugar powdered sugar
- 2- 4 tbsp milk
- assorted food color paste
Instructions
For the cookies
-
Preheat oven to 350. Lightly spray one cookie sheet with spray oil or line with parchment paper.
-
In a medium sized bowl whisk together flour, salt, and baking soda.
-
In a large bowl, cream together the butter and sugars until light and fluffy. Add the egg and vanilla and combine thoroughly.
-
Add the flour mixture to the sweetened butter. Mix only enough to incorporate flour. Do not over mix. Fold in the m&ms gently by hand as the mixer will break them up into pieces .
-
Form cookies by placing 1 inch balls of dough on the prepared cookie sheet two inches apart. Bake until light brown around the edges, about 10 minutes, depending on cookie size.
-
Your oven temperature and the type of cookie sheet you use will vary the baking times considerably. When they are golden brown around the edges is the time to remove them from the oven. Thinking they are a little underdone is probably a good thing. Experiment by baking only a couple of cookies at a time to see what the perfect baking time is for your oven
-
Cool for 10 minutes on the baking sheet before removing to a wire rack to cool thoroughly.
For the filling
-
Melt together the white chocolate chips and butter over low heat. Don’t let the chocolate mixture get too hot. You want the chocolate to be just melted but not hot.
-
Blend in the icing sugar and milk until smooth. Add only enough milk to bring the filling to a thick consistency. if it gets too thin, just add a little more icing sugar.
-
Divide the frosting into as many colors as you want to use (or just use it white) Food coloring paste works best here and not liquid food coloring.
-
Spoon the filling into a piping bags with a large plain round tip (or just a Zip-loc bag with the corner snipped off) and squeeze some of the filling onto the center of half the cookies.
-
Place the other half of the cookies on top and press down to evenly spread the filling to the edges of the cookies.
-
Allow these cookies to sit for a couple of hours for the filling to set up before serving.