Print
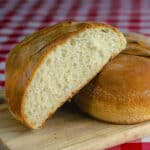
Old Fashioned Sourdough Bread
Old Fashioned Sourdough Bread - plus how to make a sourdough starter that you can use again and again. The flavour of the sourdough bread improves with the age of the starter.
Prep Time 20 minutes
Cook Time 30 minutes
Total Time 50 minutes
Servings 2 round loaves
Ingredients
For the Sourdough Starter
- 3 cups flour
- ¼ cup sugar
- 2 tsp salt
- 3 cups warm water
For the sourdough bread dough
- 3 - 3 ½ cups all purpose flour
- 4 tbsp sugar
- 1 tbsp salt
- 1 tsp instant yeast
- 1 ½ cups sourdough starter
- ½ cup warm milk
- 3 tbsp olive oil
Instructions
Prepare the sourdough starter 2-3 days ahead.
-
Whisk together the flour sugar, salt and warm water.
-
Leave this mixture uncovered in a non-metallic bowl for 2-3 days on your countertop. It will begin to ferment and bubble. This is normal. A clear liquid may form on the surface of the starter which is not a problem. Any other color of liquid such as pink or red means that your starter has spoiled and it should be discarded! Every time you use your starter you must feed it to keep it going. You can store it in the fridge in a covered bowl or large bottle with a hole in the cover. If not used for a week you can throw out half the starter and feed it again making it last an additional week in the fridge. To feed your starter, whisk in 1 ½ cups flour, ¼ cup sugar and 1 ½ cups warm milk or water. A starter that has been fed several times will result in more flavourful sourdough bread.
To prepare the bread dough
-
Using the yeast is optional in this recipe. If you have an active starter, the dough will rise on its own but will take much longer to do so; from 4-6 hours in some cases. The addition of a little instant yeast speeds up the process while keeping the distinctive sourdough flavour.
-
Combine 2 cups of the flour along with all the remaining ingredients in a large bowl or in the bowl of a large electric mixer that uses a dough hook.
-
Using a wooden spoon or the regular paddle of your electric mixer beat for 4-5 minutes until the mixture is smooth with no lumps.
-
If using an electric mixer, switch to the dough hook at this point and begin to slowly incorporate the remaining flour. If not using an electric mixer keep mixing in the flour gradually until a soft dough forms that leaves the sides of the bowl.
-
Turn the dough out onto the countertop or bread board to knead. You may need to use a little less or a little more flour, this is not uncommon. Knead the dough for an additional 10 minutes either in the electric mixer or on a bread board or countertop.
-
Cover dough and leave to rest and rise for one hour.
-
Punch the dough down and knead it for a few minutes by hand before letting it rest for another 10 minutes.
-
Divide the dough into 2 equal portions, forming each division into a ball. Place the 2 balls of dough on a greased baking sheet or on a wooden peel generously covered in cornmeal if you are planning on baking the bread on a heated stone. Cover with a clean tea towel and allow the dough to rise until it is about triple in size, about 2 hours depending on room temperature, longer if just using the starter and no yeast.
-
Bake at 375 degrees F for about 30 minutes for the baking sheet method. If baking on a stone, preheat oven to 400 degrees and allow the stone to heat up for at least a half hour before baking. Shake the raised loaf onto the heated stone from the wooden peel and bake for about 25 minutes or until the loaf is evenly golden brown and sounds hollow when tapped.
-
When baked, turn loaves out onto a wire rack to cool.
Recipe Notes
The time noted does not include an additional 3 hours or so rising time for the bread itself or the 2-3 days it takes to make a proper sourdough bread starter.
Some people will prefer a starter that's older, but just follow the instructions for feeding the starter 2 or 3 times for a deeper flavoured bread.