
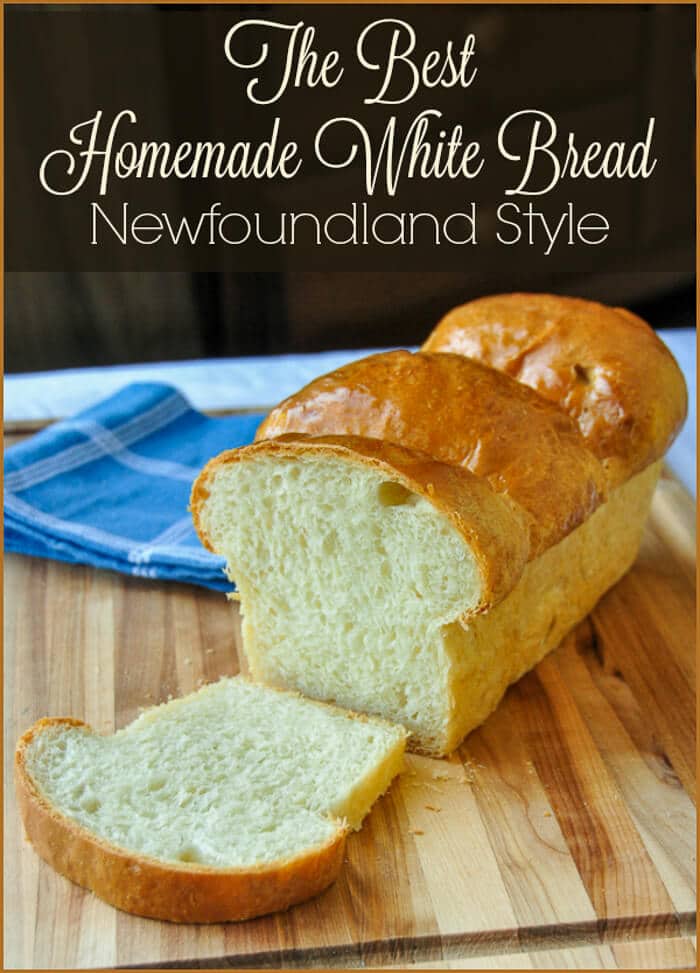
The Best Homemade White Bread
Would you like to save this recipe?
Send this recipe to my email.
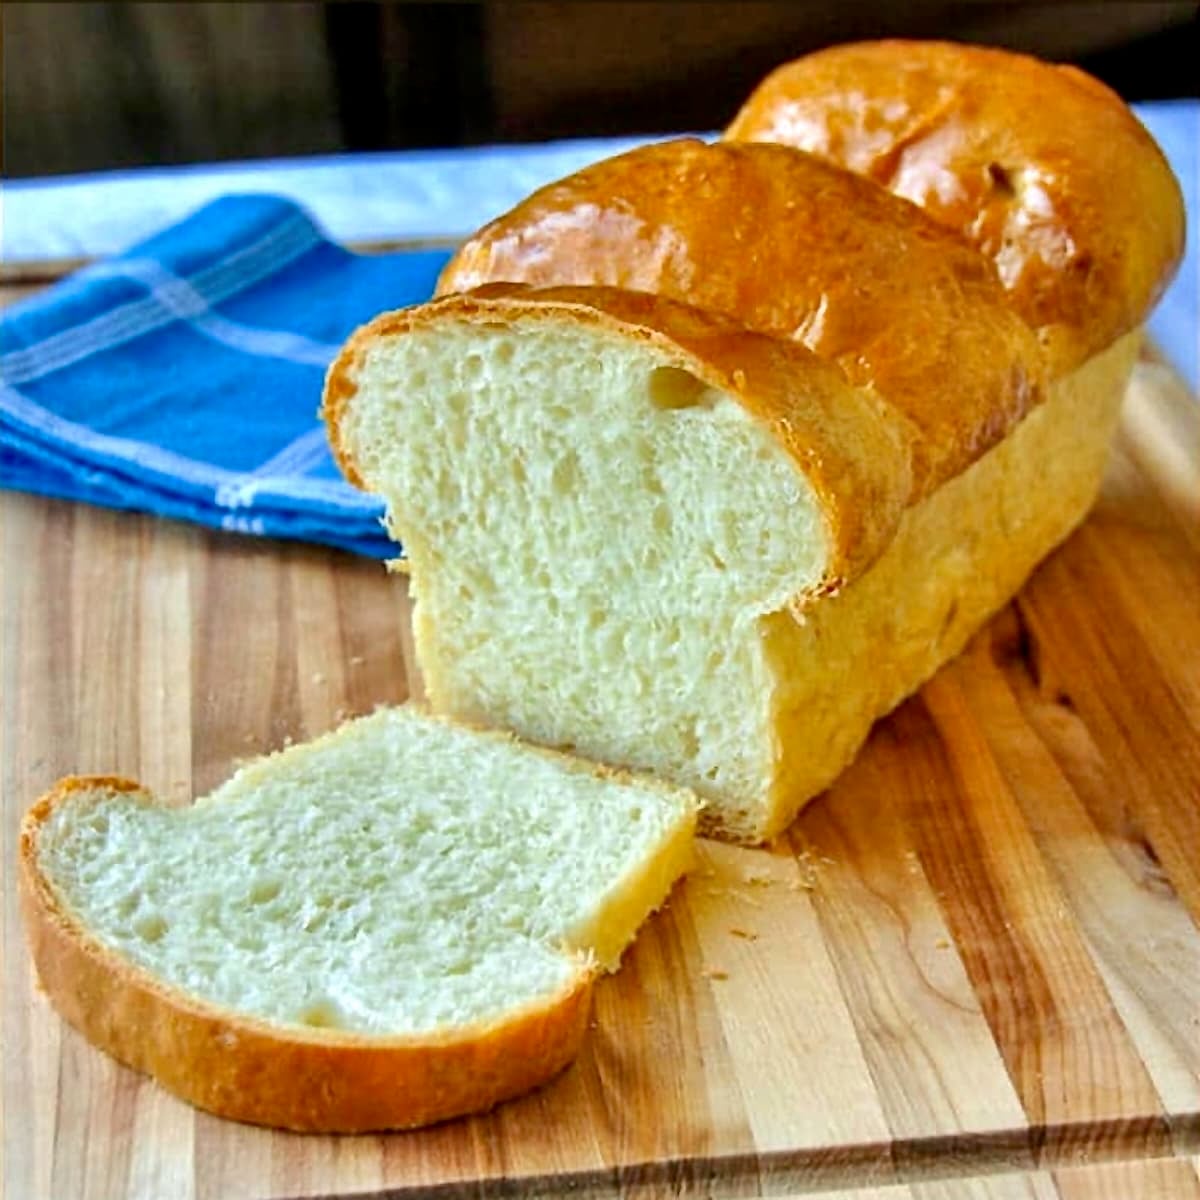
The Best Homemade White Bread. Bread baking is on the rise because nothing says home baked comfort food goodness like a perfectly baked crusty loaf of homemade bread, fresh from the oven. This recipe is well over 40 years old and turns out perfectly every time.
New! Updates on using bread flour and cold proofing overnight have been added to the recipe notes.
Originally published January 2008.
When I think of Newfoundland baking, the first thing that comes to mind is homemade bread rising high above large bread pans in 2 or 3 bun loaves. As a child of the 60's and 70's in Newfoundland, it was still the rule rather than the exception to find homemade bread in many homes.
The women in my extended family all still made homemade bread during my childhood.
With freezers in most homes by that point, though, daily bread baking was no longer necessary. Still many baked at least once or twice a week.
Who made the best homemade white bread?
Debates within the family were common on the topic of who made the best bread. A good deal of pride was taken in the ability to turn out a good batch.
...I always liked my moms twin sister, Aunt Moo's (Muriel), the best. 😉
Some senior ladies with large families of 10 or more children have told me numerous stories over the years. Stories of baking large batches of 8, 10, 12 or more loaves every day. Plus
twice on Saturdays so as to avoid baking on a Sunday.
It was hard work back then keeping all of those kids fed. I don't think most would be up to the task these days.
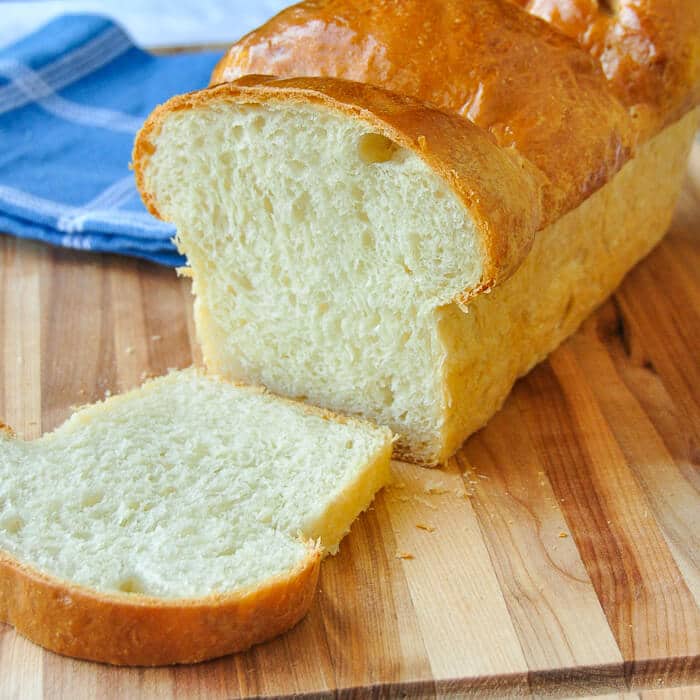
Nan's Homemade White Bread loaves were huge!
The loaves seemed much larger in those days and not just because I was much smaller! I've seen some pretty big bread pans used in my time.
I remember it was necessary to trim the side off a slice of Nan Morgan's bread just to get it in her drop down side toaster. That's the old fashioned kind that only toasted on one side and you had to turn the slice over to toast the other side.
Coming from a large family myself, the second side was almost never toasted. That's because it would have taken too long to make toast for all of our tribe.
I must have been about 10 before I had bread toasted on both sides. LOL!
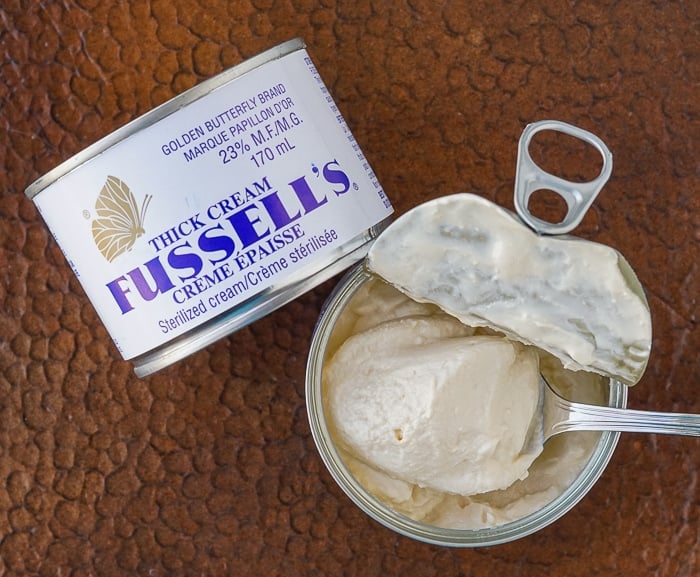
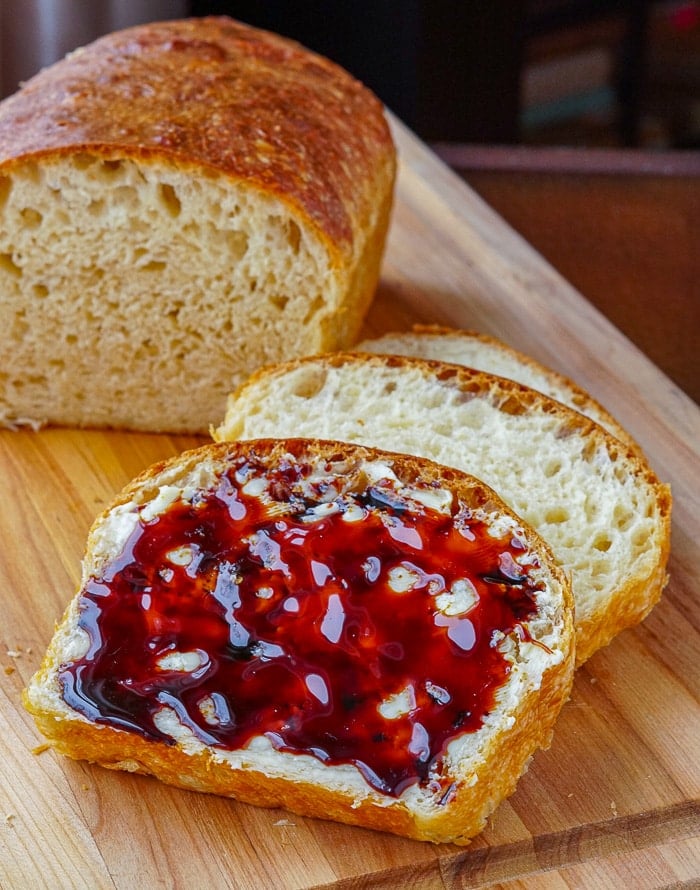
One of the things we all enjoyed back when I was growing up was thick slices of fresh bread topped with jam and Fussels canned cream. Now that I think of it, that was very much like what the British do with scones.
Nowadays I sometimes make Homemade Clotted Cream which is just amazing too!
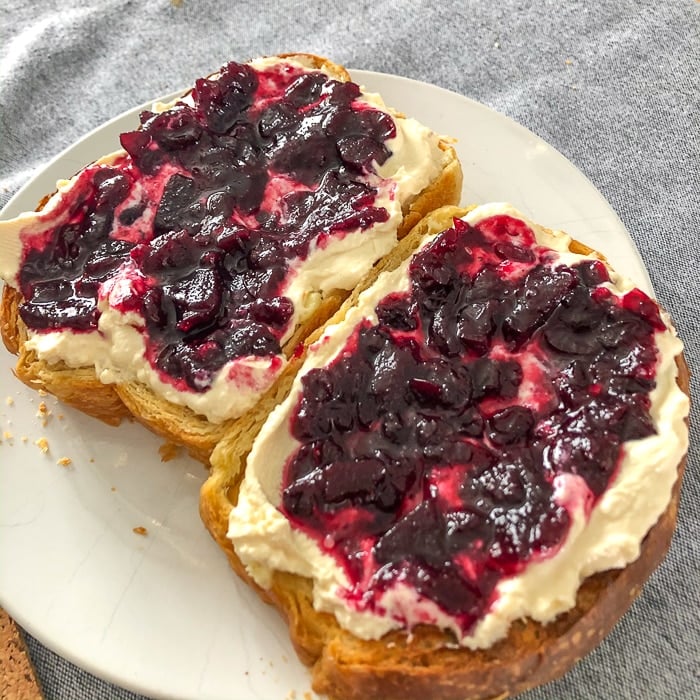
I still adore it to this day. Most recently I had it with our Partridgeberry Apple Jam. It definitely brought me strait back to childhood.
Keeping a tradition alive.
It is now much more of a rarity to find families who bake bread on a regular basis. However, I have tried to keep that tradition as part of my own family life.
I have been baking bread with my own children since they have been able to stand on chairs at the table and knead their own little balls of dough.
They still love making it and my son in particular cannot go more than a few days without his fix of homemade bread. Although we try to encourage more whole grain varieties these days. Still, he'd take plain homemade white bread over any other kind.
Homemade White Bread in smaller batches.
These days we make much smaller batches in much smaller bread pans, usually no more than a couple of loaves at a time. Often, I now prefer to use disposable aluminum loaf pans that make more toaster friendly sized slices.
Recently I've acquired some very nice narrower, longer pans that make ideal sized slices. It much less likely to over bake your bread in aluminum pans as they do not carry the heat as much as heavier pans.

Recently, I received an email request for a good basic homemade bread recipe from a young Newfoundlander living in Alberta. She wanted a recipe for "real Newfoundland Homemade bread."
I don't know that such a thing definitively exists. But, I can give you the recipe that I have been using myself with slight evolutions for over 30 years.
So go make bread and share it. You're bound to make someone happy.
Don't forget the toutons!!
There is no way to talk about making homemade bread in Newfoundland without mentioning one thing. The joys of one of the province's favourites, Toutons!
If you've never tried these pan fried pieces of leftover bread dough, you are in for a serious treat. I talk all about Toutons in this post.
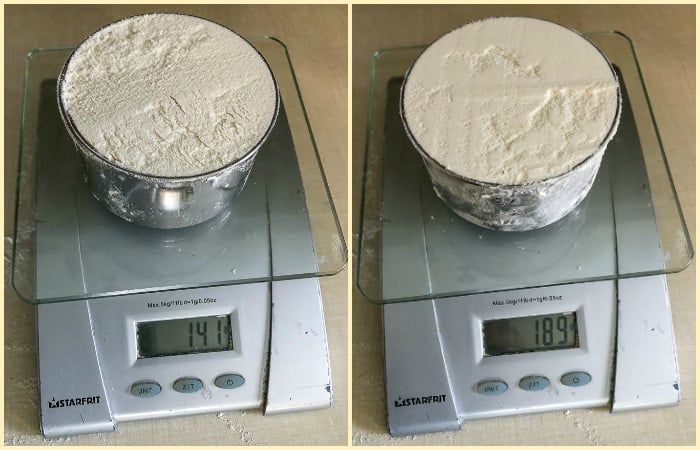
Measuring flour correctly.
It is easy to over measure flour for any recipe by as much as 30% or more as you can see in the photo below. Both are one cup of flour but one weighs much more. Read more on how to avoid this common baking pitfall in our post on How to Measure Flour Correctly.
2020 update on an often asked question.
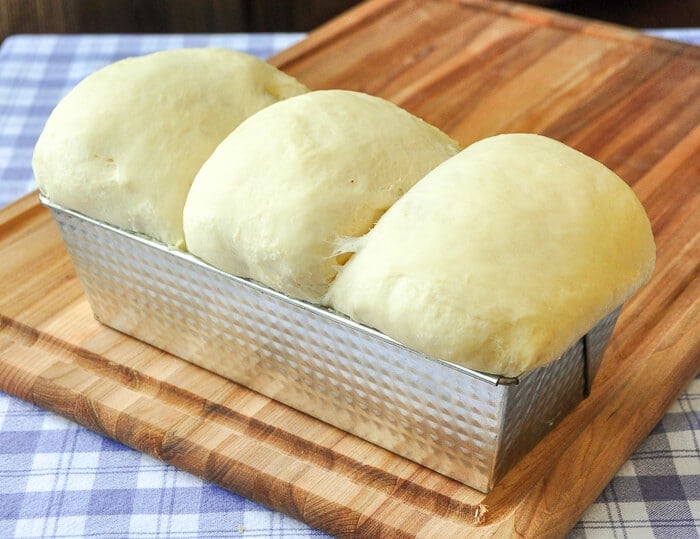
Many people have asked about the shape of the loaves we bake here in Newfoundland. I do not have a definitive answer for the reason for a 3 bun loaf, although we mostly made 2 bun loaves when I as growing up.
I've been told there is a connection to the Holy Trinity, and was a way of blessing the loaf so that it would rise well. I know many traditional bakers who would make the sign of the cross over the bread when it was set out to rise. So, this does make sense to me.
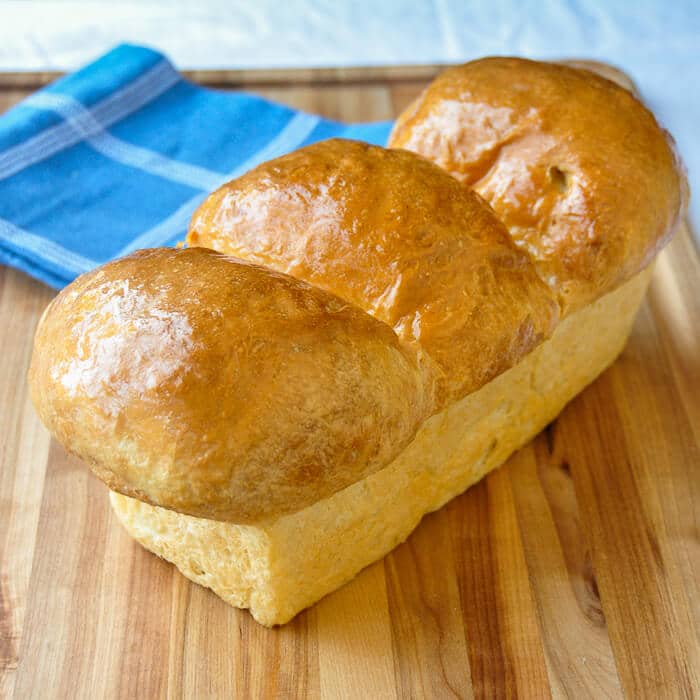
Others say it's so that there will be more "love slices" or "kissing slices". Those are the slices cut from where the dough balls meet.
The crust on these slices is a little softer from being in that slightly sheltered crater between the individual loaf sections. In may families they were always the preferred slices. I know a few families where the kids always fought over them.
Whatever the reason, it seems to be a particular baking quirk from this part of the world. Try it. You may begin fighting for a "love slice " yourself.
Brunch lover?
You'll find dozens of other great recipes like this in our Breakfast & Brunch Category and even more ideas in our Muffins, Tea Buns & Scones Category.
Like this Homemade White Bread recipe?
You'll find many more locally inspired recipes in our Newfoundland Category.
It's easy to keep up with the latest home style cooking & baking ideas from Rock Recipes. Be sure to follow Rock Recipes Facebook Page and follow us on Instagram.
Plus you'll see daily recipe suggestions from decadent desserts to quick delicious weekday meals too.
You can also sign up for our FREE newsletter to know immediately when we add new recipes. You'll also get weekly suggestions for great family friendly meals and desserts too!

Rock Recipes a participant in the Amazon Services LLC Associates Program. An affiliate advertising program designed to provide a means for us to earn fees by linking to Amazon.com and affiliated sites. Our product recommendations are almost exclusively for those we currently use or have used in the past.

The Best Homemade White Bread
The Best Homemade White Bread - nothing says home baked comfort food goodness like a perfectly baked crusty loaf of homemade bread, fresh from the oven. This recipe is well over 40 years old and turns put perfectly every time.
Ingredients
- See notes for metric weights/measures
- 6 ½ cups (approximately) all purpose or bread flour. (See notes re: the flour used)
- 1 pkg, 5 grams traditional active dry yeast
- 2 teaspoon fine salt
- 3 tablespoon sugar
- 3 tablespoon melted butter
- 2 cups lukewarm whole milk
- ½ cup lukewarm water ( I now use 1 cup. See Notes below)
Instructions
- Dissolve 1 tablespoon of the sugar in the half cup of lukewarm water. Sprinkle the yeast over the surface of the water and let stand for about 15 minutes until the yeast foams well, then stir it up.If you prefer to use instant yeast, just add it to the flour mixture in the instruction below.
- Combine 3 cups of the flour along with the 2 tablespoon sugar and 2 teaspoon salt in a large bowl or in the bowl of a large electric mixer that uses a dough hook.
- Add the prepared yeast, melted butter and warm milk.
- Using a wooden spoon or the regular paddle of your electric mixer mix for 4-5 minutes until the mixture is smooth with no lumps.
Mixer or hand kneading
- If using an electric mixer, switch to the dough hook at this point and begin to slowly incorporate the remaining 3 ½ cups of flour. If not using an electric mixer keep mixing in the flour gradually until a soft dough forms that leaves the sides of the bowl. (Note: You may need to use a little more flour. Depends on the time of year and humidity sometimes. If you have a to add another ½ cup or so, don't worry. Add only enough flour to form a dough that releases from the sides of the bowl and remains slightly tacky but able to be handled with your bare hands.)
- Turn the dough out onto the counter top or bread board to knead.
- Knead the dough for an additional 10 minutes either in the electric mixer or using your hands on a bread board or counter top.
The rise
- Cover dough and leave to rest and rise for one hour. Punch the dough down and knead it for a few minutes by hand before letting it rest for another 10 minutes.
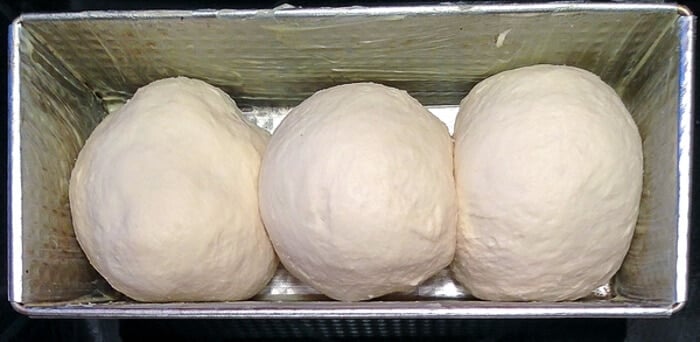
- Grease 2 medium loaf pans. Divide the dough into 4-6 equal portions. Form each division into a ball. Place 2 or 3 balls of dough in each loaf pan.
- Cover with a clean tea towel and allow the dough to rise until it is about 1 - 2 inches above the rim of the pan, about 2 hours depending on room temperature.
Cold proofing NOTES
- At this stage, the bread dough can be cold proofed overnight in the fridge if you want to serve it freshly baked early the next day or just want to save time in advance.
- I recently started placing each loaf pan in a plastic bag, as I do when baking sourdough., instead of just covering with a tea towel. I keep as much air in the bag as possible, even blowing air into the bag before closing with a twist tie. This keeps the surface of the loaf from drying out overnight.
- Just remove the pans from the fridge in the morning and allow them to finish raising, if needed, to about 2 inches or above the pan rim as shown in the photo above, which could be another 1-2 hours and bake as directed below.)
- If they are already risen enough, they can go directly from fridge to a preheated oven. This is routinely done with sourdough baking.
- You can also put the dough in the fridge after only about an hour rising in the pans, take it out in the morning and let it rise to about 1 ½ to 2 inches above the rim if the pan before baking as usual. The flexible timing here really depends on what suits you, the morning timing and when you want to serve it
Baking
- Bake in a preheated oven at 350 degrees F for 30-40 minutes depending on the size of the pans that you are using. The loaves should have a golden crust and sound hollow when tapped to be fully baked.
- When baked, turn loaves out onto a wire rack to cool. Brush the tops with melted butter if desired to soften the top crust.
Notes
Metric measures.
- 910 grams flour
- 5 grams traditional dry yeast
- 240 ml water to proof the yeast
- 3 tablespoon sugar
- 45 grams butter, melted
- 480 ml lukewarm warm whole milk
- 2 teaspoon fine sea salt
Notes on flour
While I mostly use all purpose flour for this recipe, i recently tried a new brand of higher protein bread flour, to increase the gluten and get a stretchier dough. I was very surprised by one thing though.
The bread eventually turned out fine but I ended up adding about another ½ cup if water to the dough. It turns out bread flour absorbs more liquid than all purpose flour, so the entire amount of flour mentioned in the recipe was too much.
I could see that the dough was going to be too dry and tough, making it harder to handle. I caught it in time to add more water before continuing adding the flour.
Not all flour, nor all brands, behave in the same way, so now I have a new recommendation.
Whatever flour you are using, proof your yeast in 1 cup if water instead of ½ cup.
Continue with the recipe as normal but add the second half of the flour in small ¼ cup increments until you get the right tacky texture to the dough and it leaves the sides if the bowl clean as mentioned.
This may mean you will use all of the flour, even a few tablespoons more.
Or it may mean you won't use the last bit at all.
To sum up, let the dough decide.
Bread dough is somewhat flexible and forgiving. Exact measurements are not always possible or necessary.
With experience the feel if the dough will become more familiar to you, and you will develop a sense of when it is right. Soft and slightly tacky to the touch, without sticking to your hands, but not so tough that it becomes hard to knead by hand.
Hope this was helpful, and here's to happy and successful bakes! Barry..
Recommended Products
Rock Recipes a participant in the Amazon Services LLC Associates Program, an affiliate advertising program designed to provide a means for us to earn fees by linking to Amazon.com and affiliated sites. Our product recommendations are almost exclusively for those we currently use or have used in the past.

Nutrition Information
Yield
20Serving Size
gAmount Per Serving Calories 63Total Fat 3gSaturated Fat 2gTrans Fat 0gUnsaturated Fat 1gCholesterol 7mgSodium 257mgCarbohydrates 8gFiber 0gSugar 3gProtein 2g
The nutritional information provided is automatically calculated by third party software and is meant as a guideline only. Exact accuracy is not guaranteed. For recipes where all ingredients may not be used entirely, such as those with coatings on meats, or with sauces or dressings for example, calorie & nutritional values per serving will likely be somewhat lower than indicated.


My grandma is from Newfoundland, and we attempted this recipe the other day. It didn’t turn out great (she said it was “dunched,” haha) because we put the instant yeast in with the flour and didn’t compensate for the missing water. Maybe that could be added as a note in the recipe? (Sorry if it is and I missed it!) Anyway, I tried it again and let the yeast bloom, even though it is instant yeast, and today she said that batch looked just like her mother’s. Success! I’m so happy that it turned out the second time. Thanks for this!
Absolute perfection!! I added an egg to the recipe to make it even lighter and fluffier. AMAZING!!!
I made this bread this morning just put it in the loaf pans to rise I know it’s going to be good just by the feel it was so easy to work with .I used the traditional yeast and proofed it with 1 Tablespoons natural honey and added 1 more Tbsp honey with the melted butter it did rise really good. I made it in my kitchen aid mixer . I’m diabetic so mostly always use natural honey for proofing yeast it works the same as sugar. .I made one loaf bread last week using this recipe but decided to use the whole recipe this time and freeze one it’s always good to have an extra one in the freezer in case guest come by. Thanks for sharing this one Barry Parsons all of your recipes and advise is much appreciated. ⭐️⭐️⭐️⭐️⭐️
Hi there, I made this bread last night and came out perfect except I think I used too much salt as was very salty. I was wondering if u are suppose to use salted butter or unsalted? Of course I didn’t measure the salt so totally my fault but want to make it today again. Thank you
Salt should never exceed 2% of the flour weight. Adding any more or estimating is NOT advised.