
Detailed Instructions for Making a Lighted Gingerbread House
Would you like to save this recipe?
Send this recipe to my email.
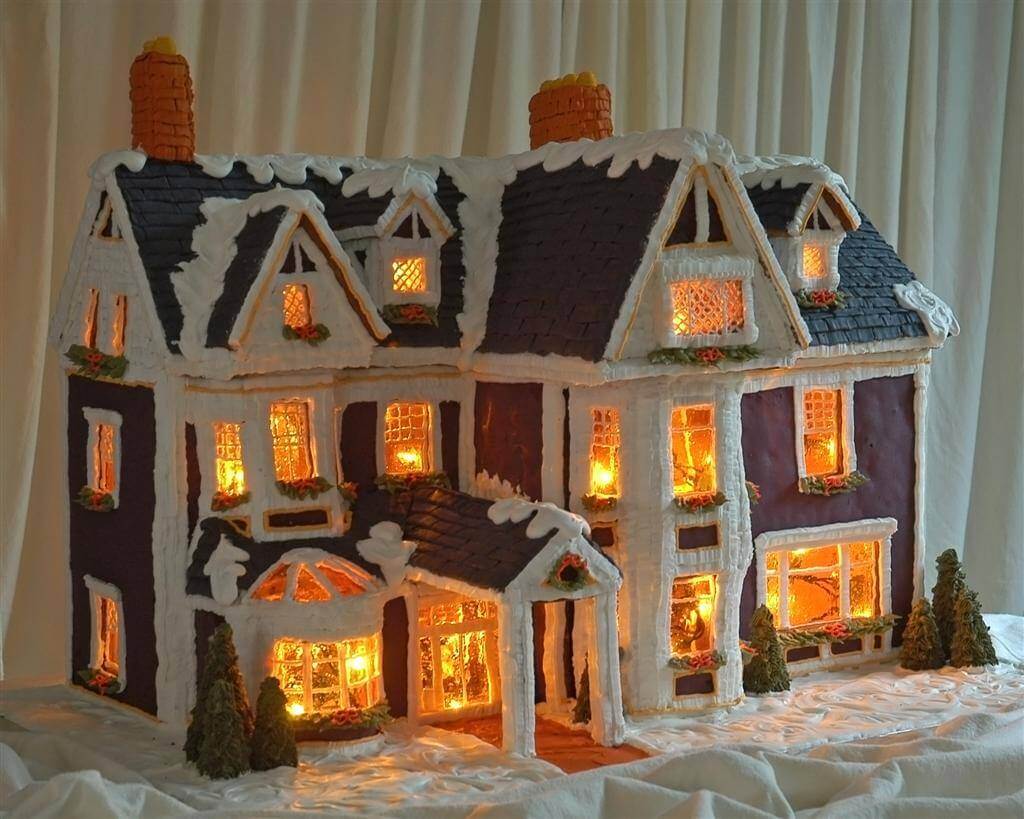
Detailed Instructions for Making a Lighted Gingerbread House. Complete with recipe for the gingerbread walls and lots of details on how to plan and construct a beautiful Christmas tradition.
Originally published on November 11, 2008
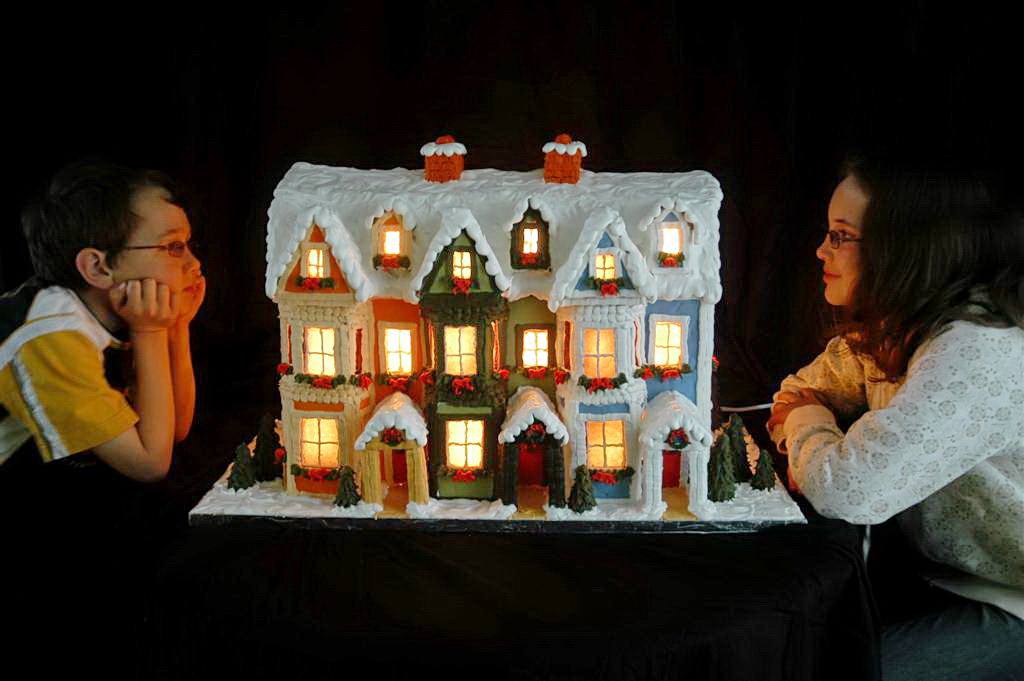
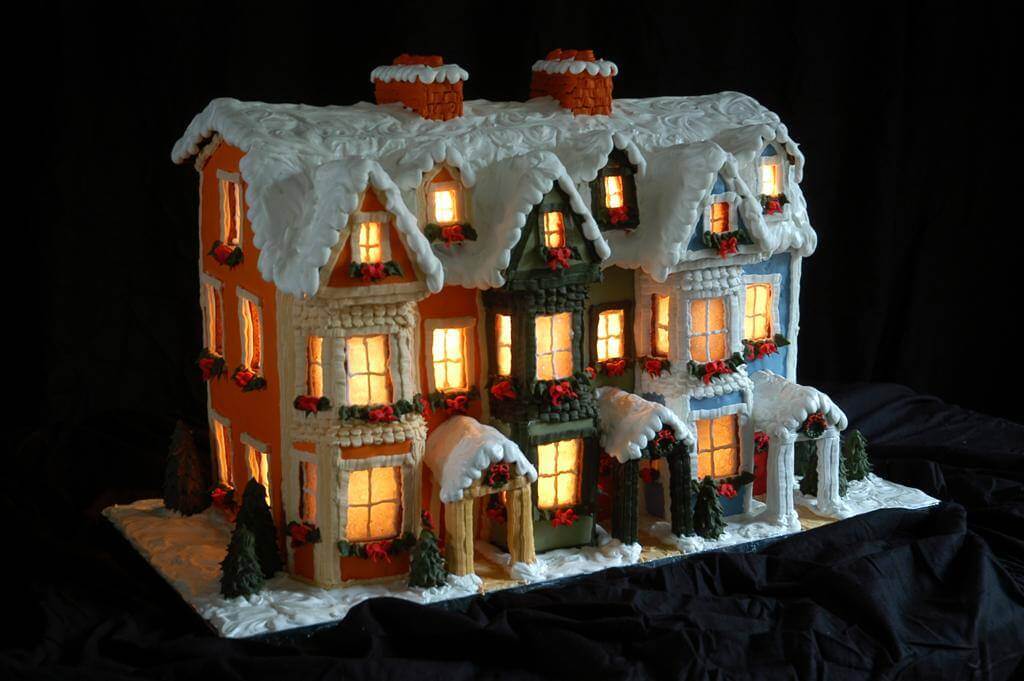
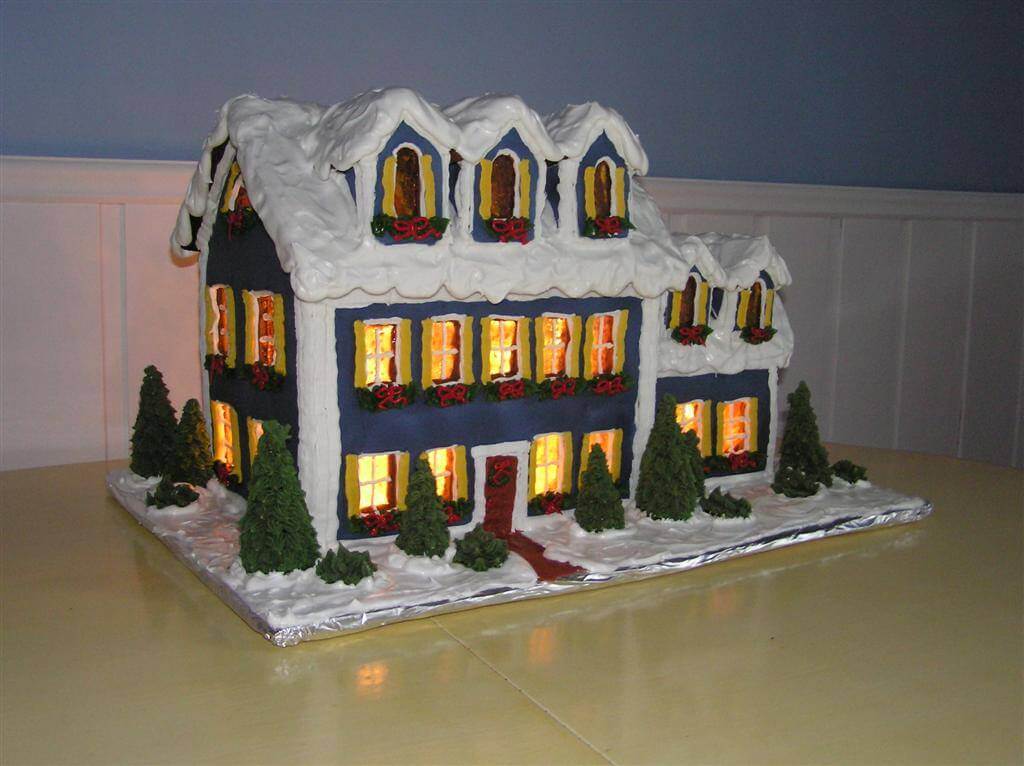
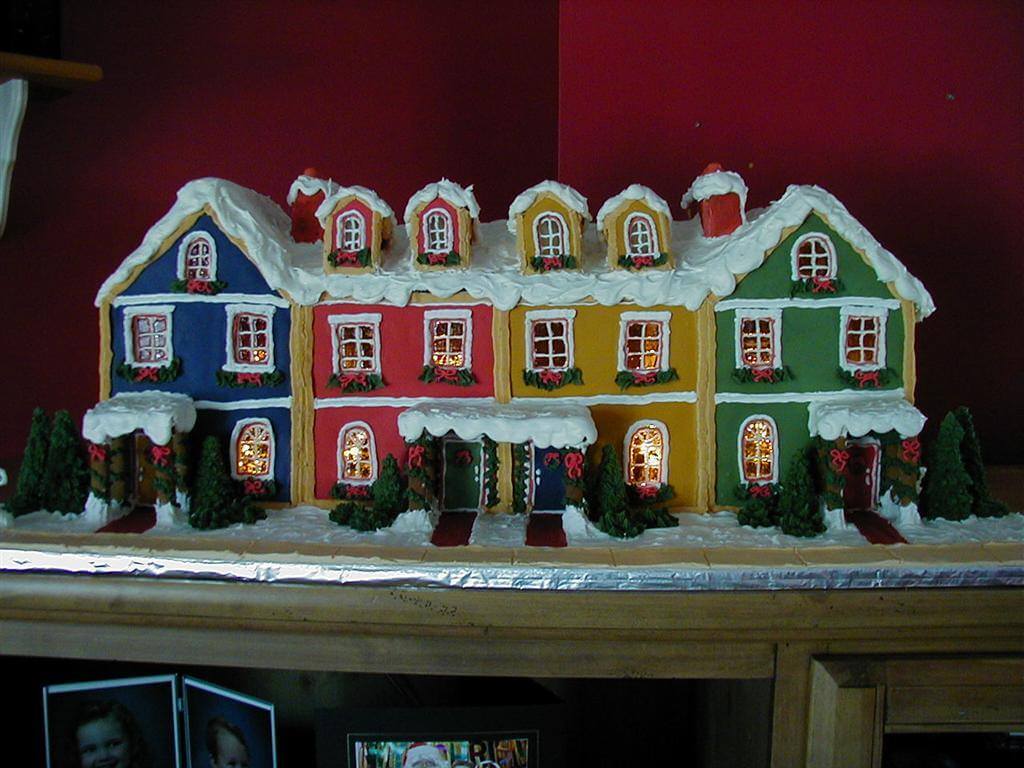
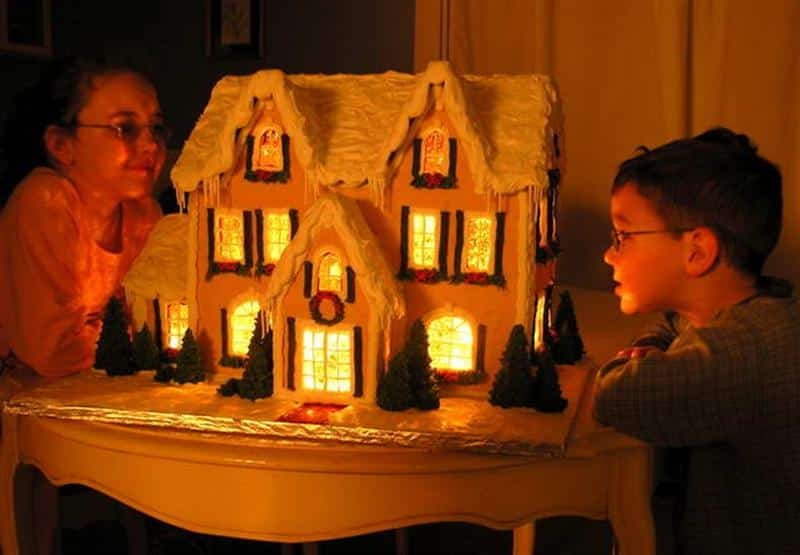
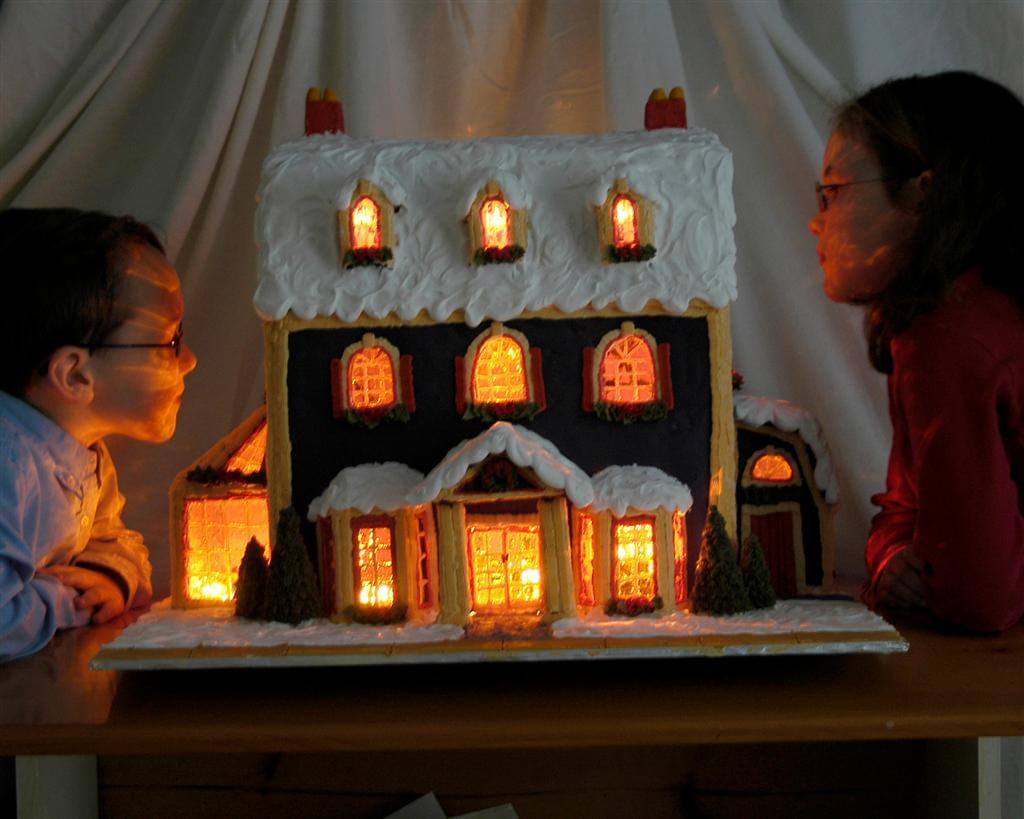
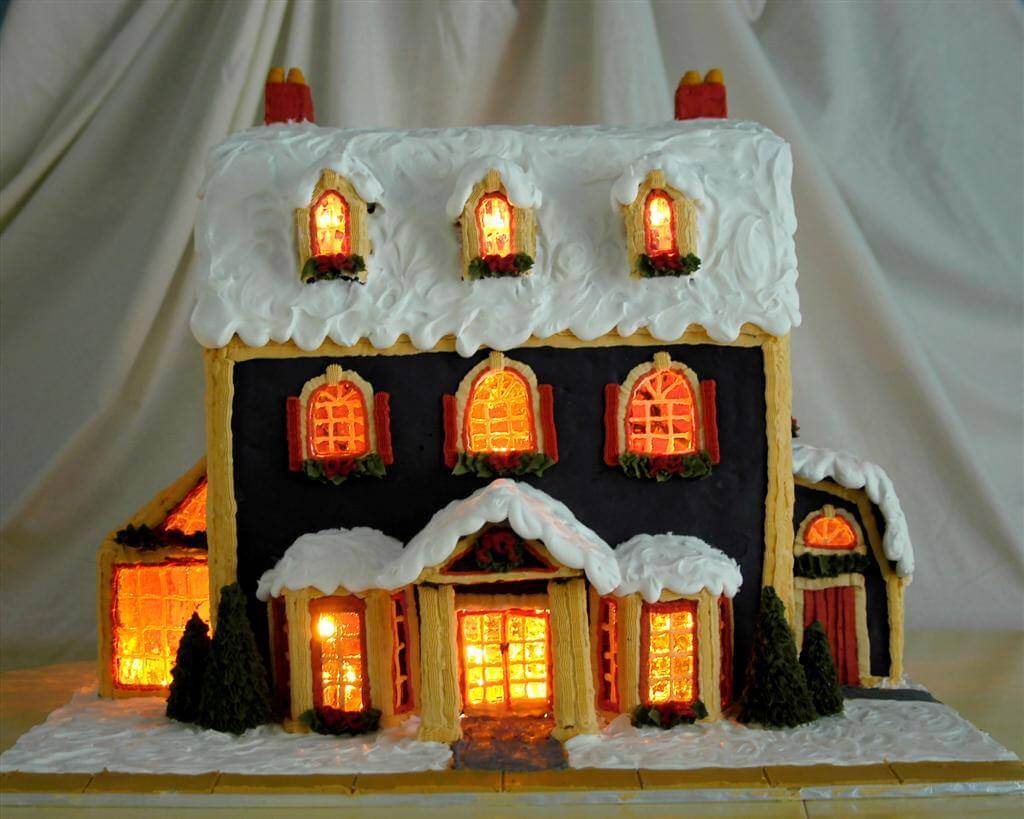
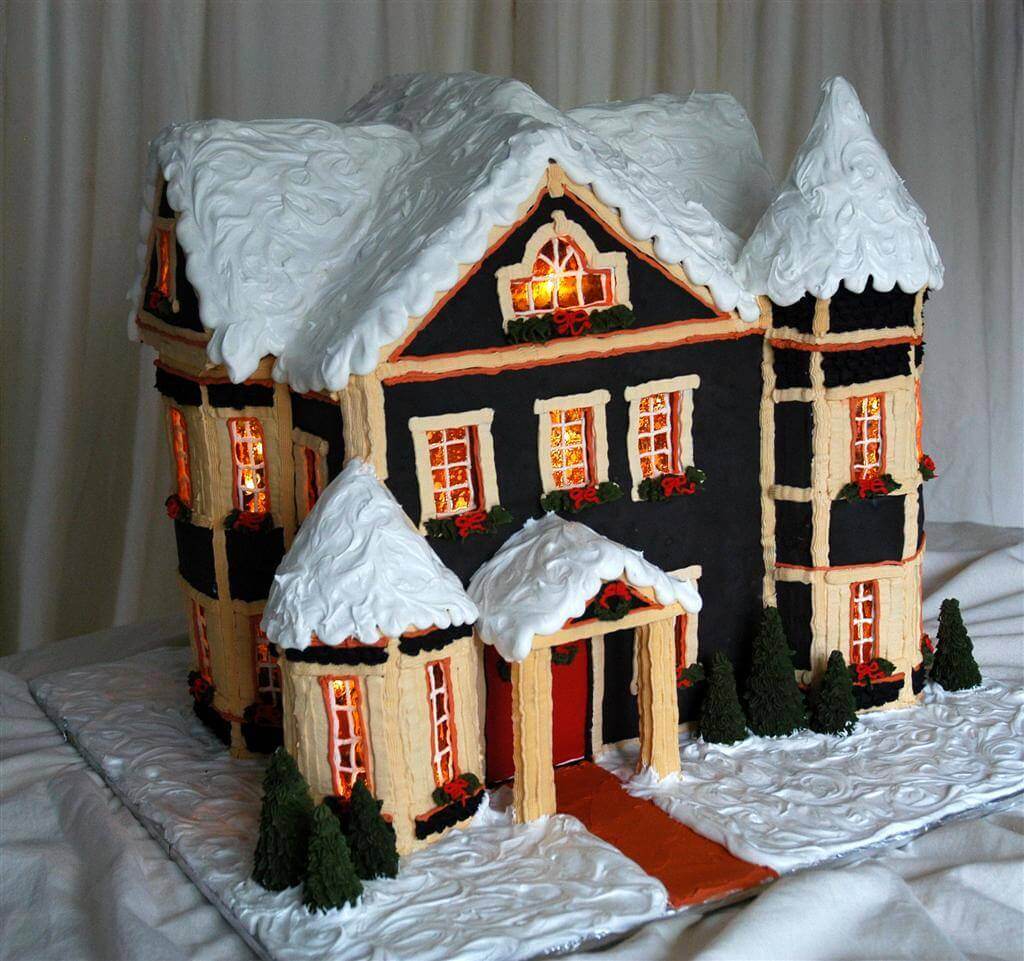
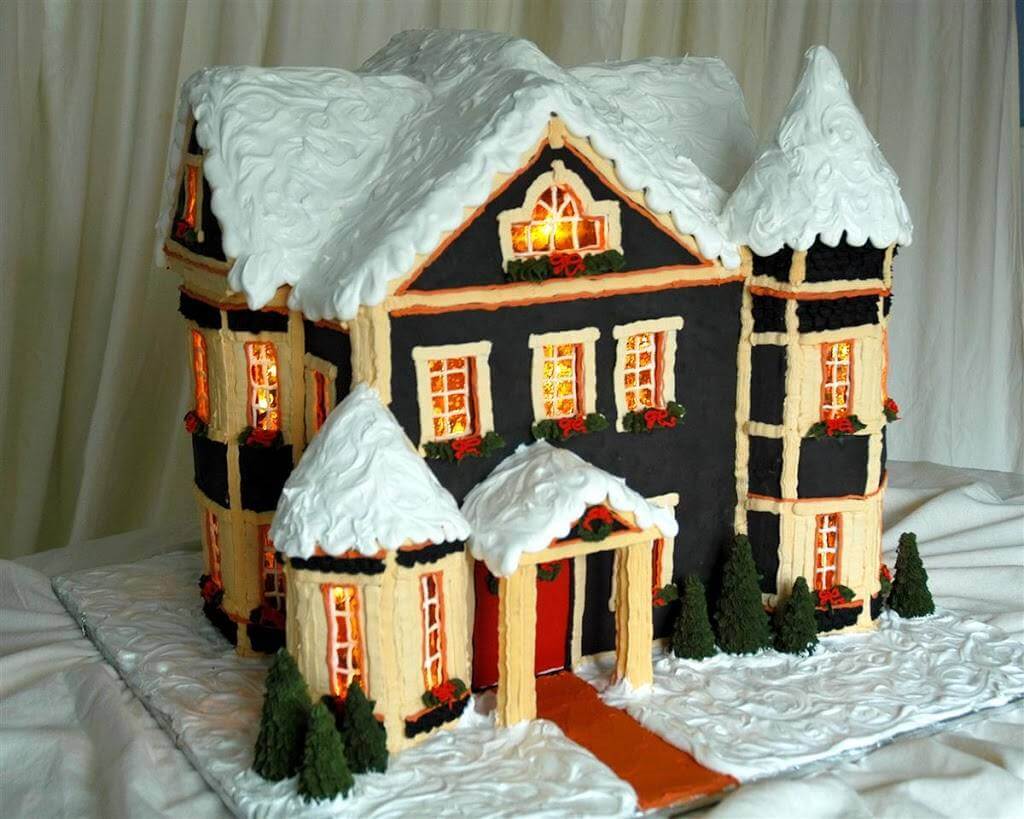
Watch a construction video slideshow below of the most complex of the hoses that I have constructed so far, based upon a beautiful home in my neighbourhood.
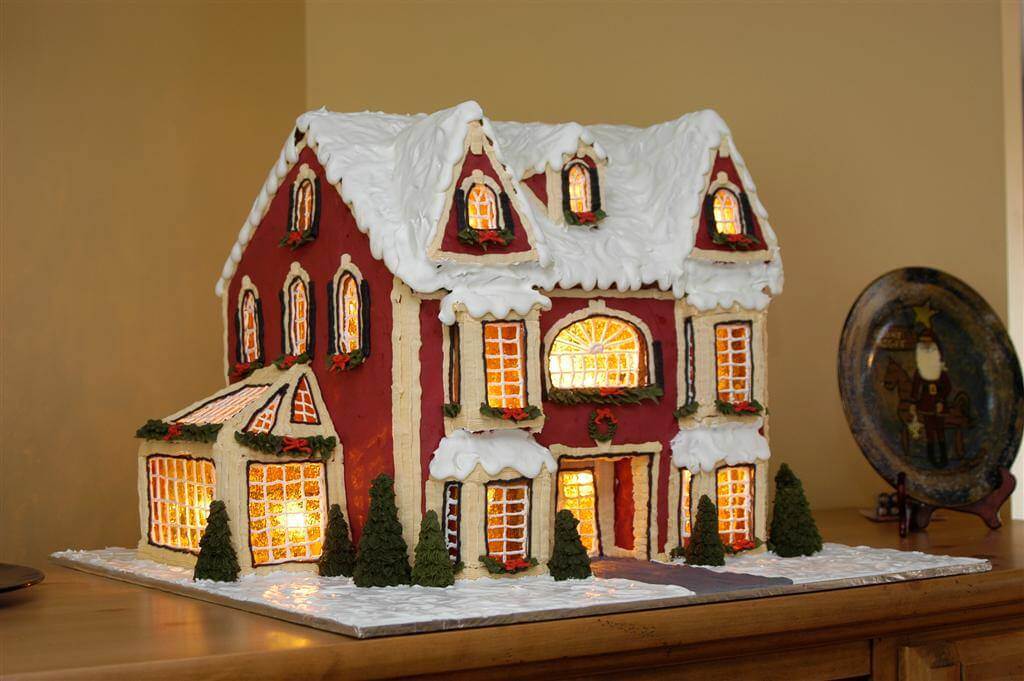
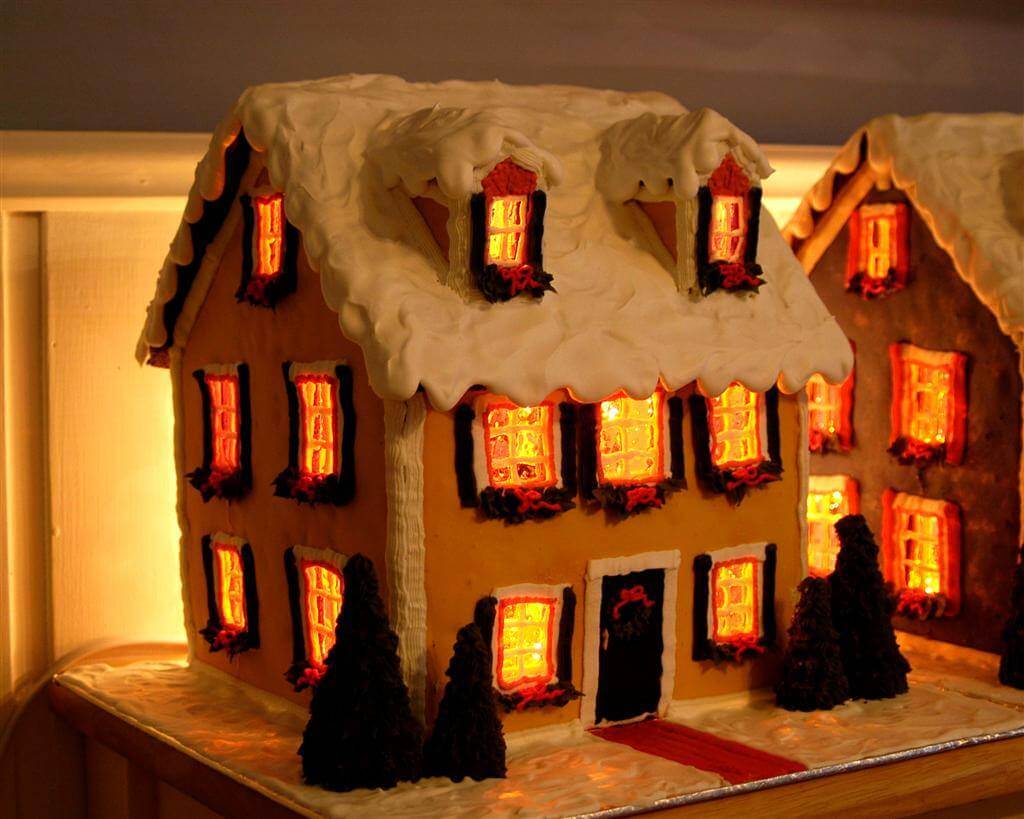
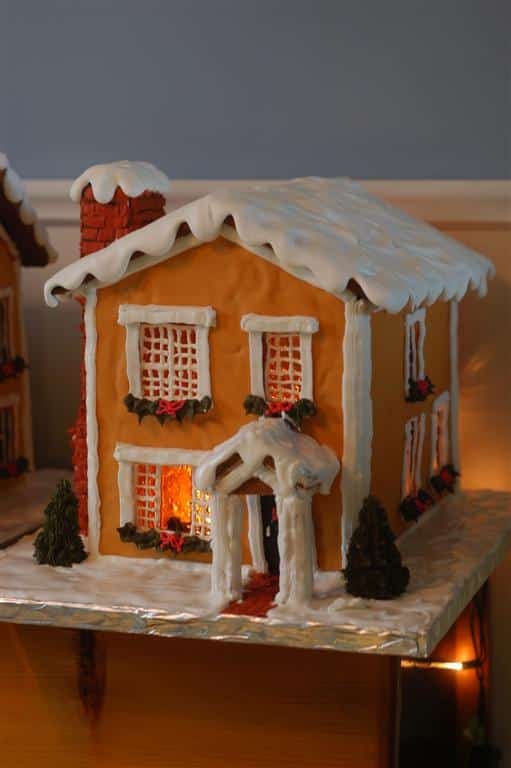
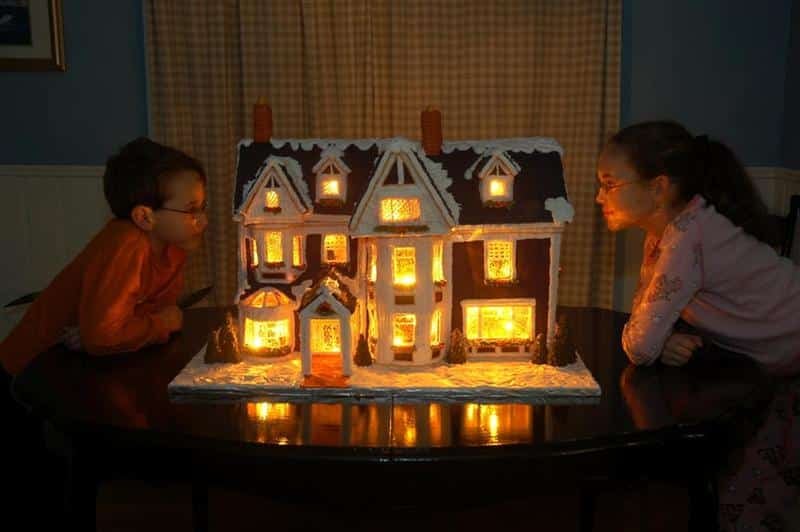
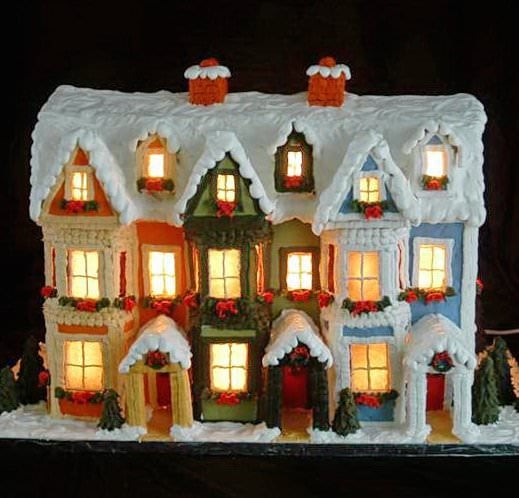
I've received many requests for a gingerbread recipe and some detailed instructions for constructing a gingerbread house so I have decided to post them here. I've also added some more photos of other gingerbread houses from the past few years.
Here are a few links to construction slideshows of three of the houses as well:
Another Circular Road Christmas
The Original Circular Road Christmas
For more Christmas cooking and baking ideas, be sure to visit out Christmas Recipes Category.


Detailed Instructions for making a Lighted Gingerbread House
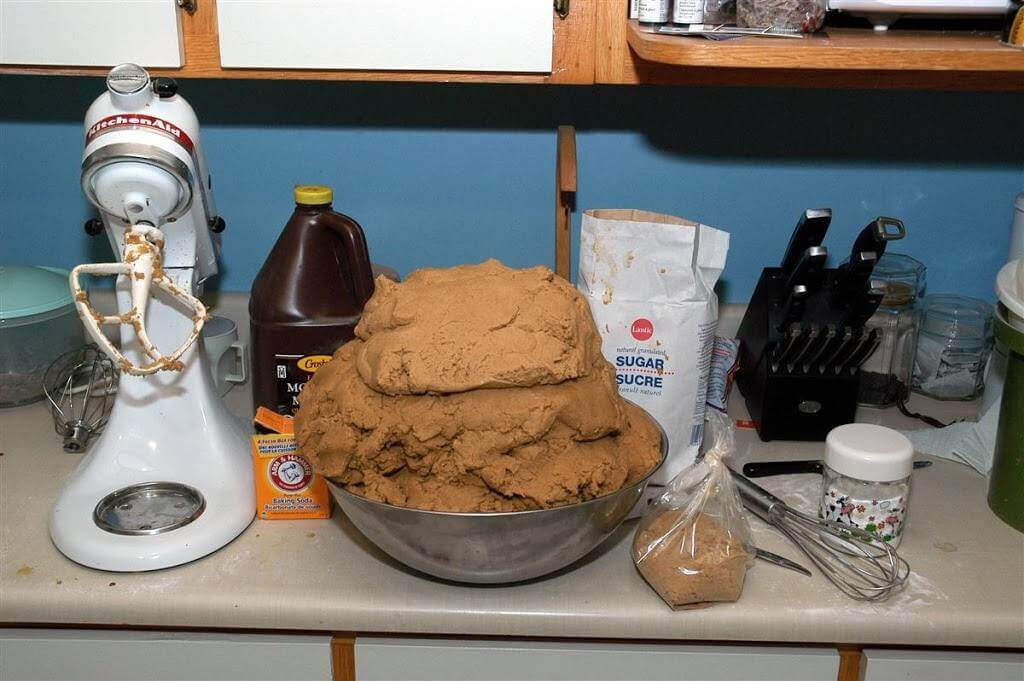
Before starting the instructions for making a gingerbread house, a note on the gingerbread recipe: Unless you are planning to eat your house, it is a great idea to double or triple the amount of spices in your gingerbread dough.
The gentle heat from the lights in your house will create a very spicy and fragrant aroma in the room. Recipe follows the instructions.
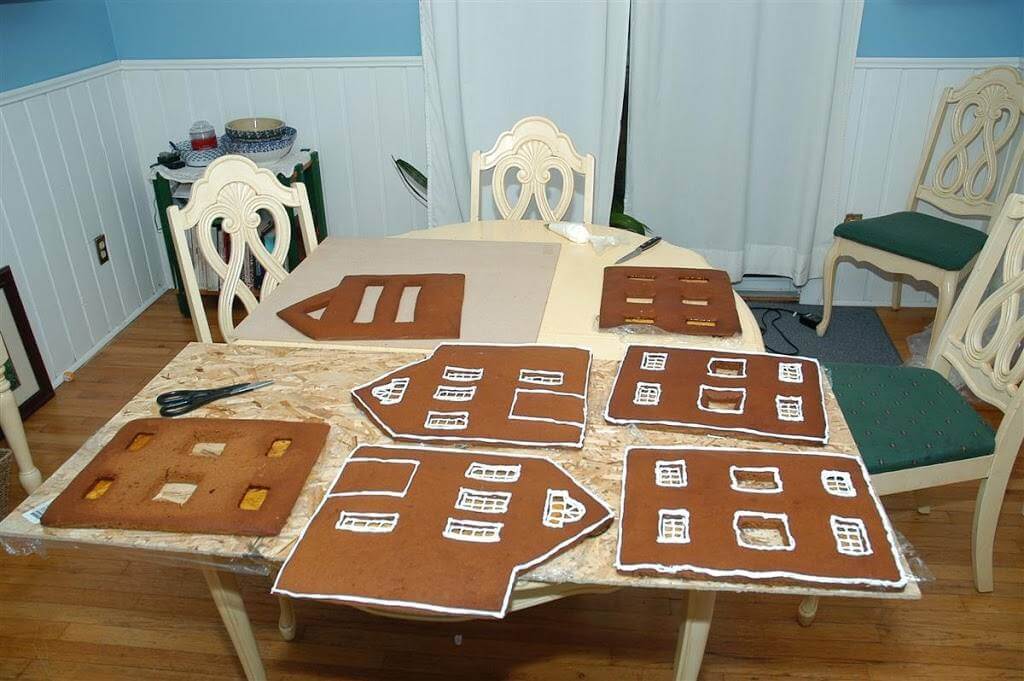
- Create templates from cardboard for gingerbread house walls and roof.
- You can assemble the cardboard pieces with scotch tape to make sure everything is the correct size.
- If you are making a particularly large house it is essential to make an additional side wall or two to be placed in the centre of the house to help carry the weight of the roof.
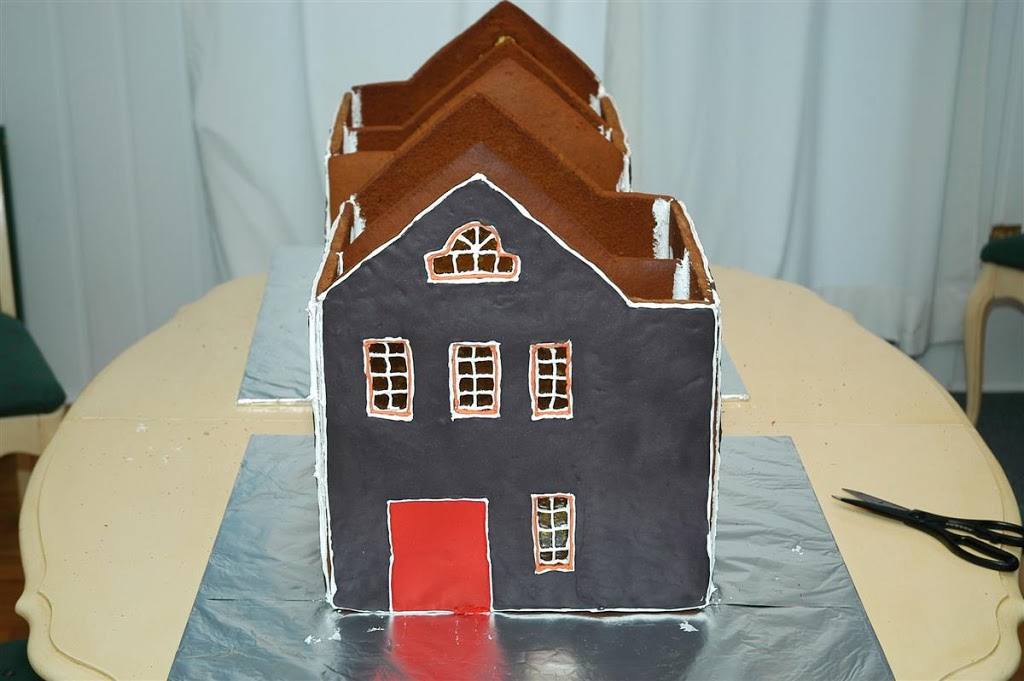
- Use templates as a guide to cut the dough into the desired shapes.
- Windows and doors can be cut out at this stage as well if you plan to make candy windows for an internally lit house.
- The back of the house should be plain with a hole or holes large enough to insert a set of mini lights.
The number of lights depends on the size of your house. A set of 100 is usually enough for quite a large house. - Trim edges and windows as necessary while the gingerbread is still hot. Straight edges are a must.
- Cool on the baking sheet or another completely flat surface.
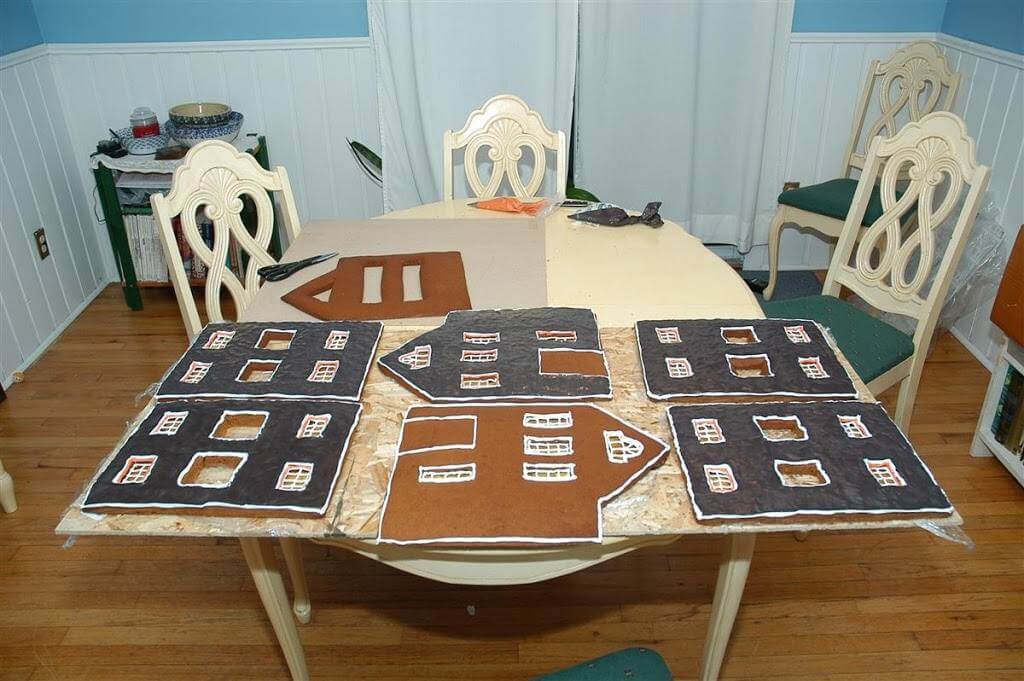
- Prepare the pieces for windows by placing them on cardboard covered in several layers of newspaper and several layers of plastic wrap.
- The cardboard will protect your table or countertop from the hot liquid candy and be flexible enough to allow the windows to release from the surface once cooled.
Windows
- In a heavy bottomed pot ( I use a triple layer copper core pot) gently boil:
- 3 cups white sugar with ½ cup water until it reaches hard crack stage.
- Do not stir this mixture as it boils, this can cause crystallization of the sugar.
- You can test the mixture by dropping a spoonful into very cold water to see if it hardens. I like to leave it until it begins to turn slightly golden as this creates sort of a candle glow effect when back lit.
- Watch the pot constantly and take it off the heat at the first sign of golden color, as this liquid will burn very, very quickly past that point.
- I take it off the heat when the first scent of caramel occurs and it is slightly golden. You can immerse the bottom of the pot in an ice bath for a few seconds to stop the color turning too dark if you like
- Immediately, slowly and very carefully pour the hot liquid into the window cutouts and leave to cool completely.
- Be very careful while pouring hot candy, you can sustain a very serious burn if you spill it on your skin.
It’s best to keep the kids out of the kitchen for this part.
Note: High humidity can cause the windows in your house to dissolve and begin to "melt" and run down over the sides of your house.
The lights in your house will gently heat it from the inside out and prevent this from happening and they must be kept on as long as possible.
If your windows are sticky to the touch this indicates high humidity and you should leave the lights on longer. I usually leave mine on all day only turning mine off when I go to bed but your environment may be different.
You may even be able to keep your house for more than one Christmas by being conscious of this fact and storing it in a humidity controlled area.
Royal Icing
It is very important to use grease free utensils and glass or metal bowl when
making this icing.
This icing dries very hard and acts as the glue to hold your house together.
As the amount of egg whites varies with the size of your eggs, you will need to exercise some judgment when making this icing depending upon the intended use.
You can always add a little more icing sugar to make it as thick as possible when gluing your walls in place or conversely add a little egg white (a tablespoon at a time) to thin it out to "paint" your house.
To cover your roof in "snow", the consistency will be somewhere in the middle where soft peaks form but it does not run.
This one you have to learn by doing.
Royal Icing recipe
- 4 cups (440 grams) confectioners' (powdered or icing) sugar
- 3 large egg whites, room temperature
- ½ teaspoon cream of tartar
- 1 tablespoon water (if needed)
- Whip all ingredients together until very stiff and fluffy, preferably with the whisk attachment if your mixer has one.
- If you wish to "paint" your house, you can do so by outlining all the edges of your pieces in Royal Icing using a number 4 piping tip. This includes the entire perimeter of the piece plus around any windows and doors.
- Trace the outline twice with Royal Icing to double the height of your outline.
- Next, color more royal icing with Wilton brand decorators color and add enough water ( or even better spoonfuls of egg white), a tablespoon at a time, to the royal icing so that it will pour into your outline easily but not so thin that it will be too runny. Somewhere about the consistency of cold honey is good.
- Leave this to dry at least overnight. A couple of days is better.
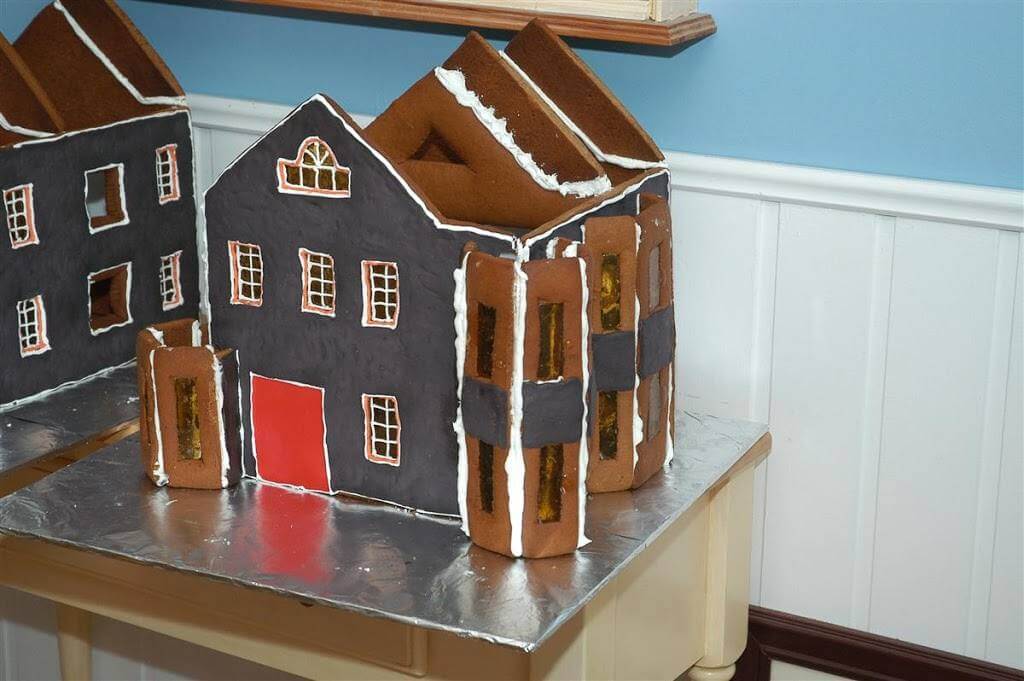
- You are now ready to assemble your house.
- An extra set of hands is very helpful, if not essential for larger houses, at this stage. A batch of very stiff Royal Icing is needed for "glue".
- Using a #12 tip, pipe royal icing onto both edges to be joined and push them together. Run your finger along the inside corners to spread the icing tightly into the corners. This will greatly help the stability of the structure.
- You can even pipe extra Royal icing into these inside corners to add extra “glue”. This is very necessary in larger houses.
- Continue until the outside walls (and internal supports, if any) are in place.
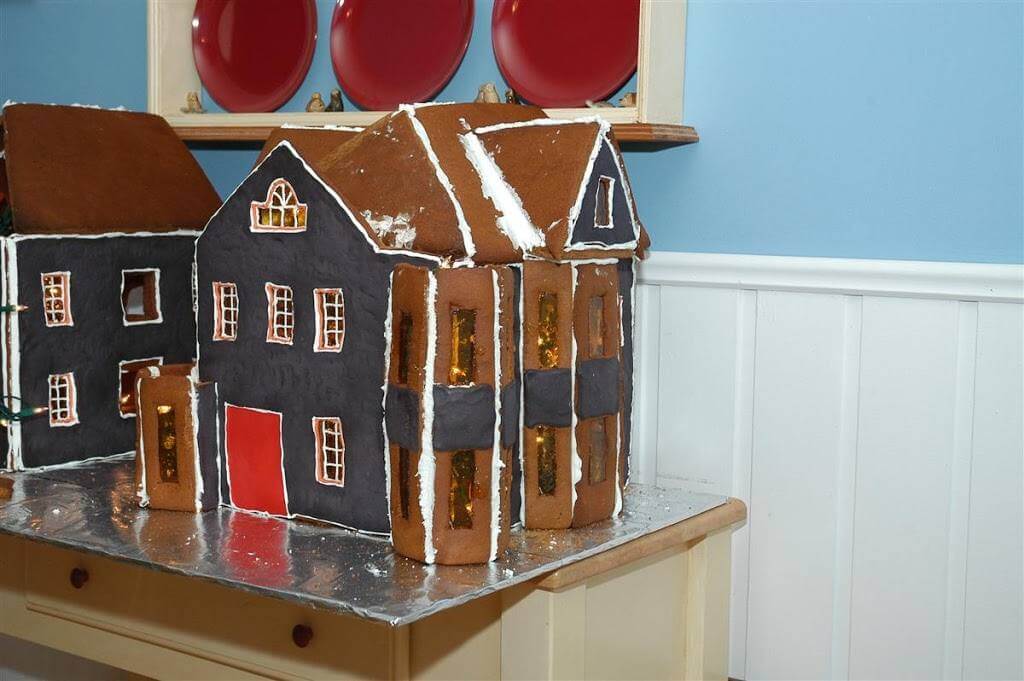
- Let these pieces dry for several hours or overnight before attaching the roof sections in the same way.
- It is not advisable to rush to get the roof on, the whole thing can collapse if the "glued" walls are not completely dry. You can use heavy tin cans wrapped in dish towels to hold up the walls as they dry together if you like for extra security.
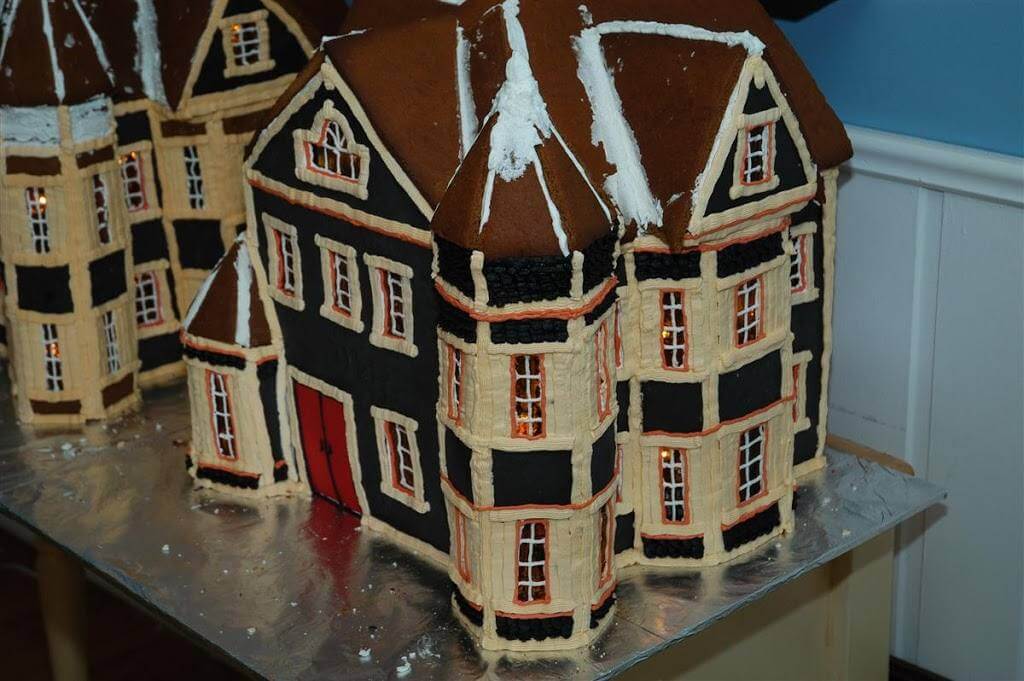
- Decorate your house as you see fit. Take cues for details such as corner boards and window casings, shutters and the like form actual houses. Take some photographs of heritage houses and use details from them.
- If you like, you can landscape your house with Royal icing trees and shrubs which can be made using a star tip to pipe green royal icing onto aluminum foil covered conical forms. You can purchase these at any craft store.
- These usually take a day or so to dry before you can remove the aluminum foil.
- Good luck and Merry Christmas.

Detailed Instructions for Making a Lighted Gingerbread House
Ingredients
- ½ cup sugar
- ½ cup margarine
- ½ cup dark molasses
- ¼ cup cold water
- 2 ½ cups flour
- ¾ tsp salt
- ½ tsp baking soda
- 2 tbsp powdered ginger
- 1 tsp cloves
- 1 tsp allspice
Instructions
- Cream margarine and sugar well.
- Blend in molasses and water.
- Sift together remaining ingredients and blend together until dough forms.
- Knead for a couple of minutes, adding a little more flour if it is too sticky.
- Chill 2 to 3 hours. Depending on the size of your house you will need several batches of this dough. I have used as many as 20 in my largest houses.
- Bake at 350 degrees, basically for as long as you can.
- Larger pieces will take longer. You are trying to dry out the gingerbread as much as possible without burning it.
Nutrition Information
Yield
24Serving Size
1Amount Per Serving Calories 119Total Fat 4gSaturated Fat 1gTrans Fat 1gUnsaturated Fat 3gCholesterol 0mgSodium 102mgCarbohydrates 20gFiber 0gSugar 9gProtein 1g
The nutritional information provided is automatically calculated by third party software and is meant as a guideline only. Exact accuracy is not guaranteed. For recipes where all ingredients may not be used entirely, such as those with coatings on meats, or with sauces or dressings for example, calorie & nutritional values per serving will likely be somewhat lower than indicated.

Wow! This looks so cool! I've never made a gingerbread house before...it looks so fun!
Hello, I love your houses, where do you get the templates? And what kind of lights do you use to lighten the houses?
When I'm making 100+ gingerbread houses at a time, or if I'm teaching someone new to baking gb houses, I love using A frame construction. Two triangles, two rectangles. Seriously easy, and fast to put together! I wrote up a tutorial as a guest post for Frog Prince Paperie here: http://frogprincepaperie.com/2010/12/gingerbread-house-tutorial-and-how-to-from-a-pro.html
I don't get the templates anywhere. I just make up my own designs based upon photos I take of houses I like. I just string a set of mini lights inside for the light.
Berry they are just gorgeous, I can't make patterns of my own, would you recommend any source that i can find a good pattern or would you consider to share your patterns with us?? 🙂
best
pinar
Sorry but I don't know any sources for templates. I've never used any other than my own and since I never make the same one twice, I've never kept mine either. Most of the houses I make would have templates much too large for a conventional printer anyway. I'd reccommend that you start with a very simple house to hone your skills and gradually you will find yourself eventually making more complex designs as you become more comfortable with it. Best, Barry.
MY CONGRADULATIONS FOR YOUR HOUSES ,IVE NEVER SEEN STH LIKE THAT BEFORE.EVERY YEAR I MAKE
2-3 SMALL HOUSES AND MY CHILDREN LOVE THEM
AND ALL MY FRIENDS TOO.IN GREECE ITS STH UNUSUAL ,ITS NOT IN OUR CULTURE SO EVERYBODY
LOVE THEM.THIS YEAR IWILL TRY TO MAKE ONE OF YOURS ,YOUR INSTRUCTIONS ARE VERY HELPFUL.
MERRY CHRISTMAS FROM CRETE ISLAND,GREECE
ANDRIANA
Hi Barry
Could you tell me what high your houses generally are?
You are the gingerbread master! Your creations are a beautiful tribute to the architecture of St. John's: I'm sure I recognize a few of those houses! I look forward to seeing what you create this year.
Wow! This is just SO amazing!!
All of your information on gingerbread houses has been very helpful the past couple of years! I have 2 questions about making the windows. 1- Last year when I tried them they dried completely opaque, do you know what I may have done wrong? 2- How do you make the sugar glass for your bay windows? They look like separate pieces of glass instead of having been poured into window spaces in the gingerbread. Your answers would be very much appreciated! Thanks!
Sounds like you didn't achieve the proper temperature in the sugar for the windows. Did it turn an amber color before you poured it. Which photo are you referring to for the bay windows.
Hi!
What kind of icing did you use for the snow on the rooftops? It looks beautiful!
Thanks,
Kate
The Royal Icing recipe is in this post, Kate.
Mr. Parsons
On your recipe, have you already doubled or perhaps tripled the amount of spices? Thanks
No this is my standard gingerbread cookie recipe. Add lots more spice if you like. I think clove is my favorite spice scent in this one.